
If you’ve worked with WordPress and ACF Pro but haven’t explored ACF blocks much yet, this guide is a great place to start. I’ll walk you through how to structure ACF blocks directly inside your WordPress theme (no plugin required!).
What you’ll need:
- A local development environment – I like Local by Flywheel for spinning up WordPress sites quickly.
- Advanced Custom Fields: PRO – License required
- Code editor of your choice – I use Visual Studio Code but anything you’re comfortable with works fine.
Blocks structure
We will be creating three blocks in this tutorial:
- A Faq Accordion block
- A Review block
- An Image block
First, open up your theme directory and create a new blocks/ folder. Inside of that, create the following structure:
blocks
├── block-faq
│   ├── block.json
│   ├── template.css
│   ├── template.js
│   └── template.php
├── block-image
│   ├── block.json
│   ├── template.css
│   └── template.php
└── block-review
    ├── block.json
    ├── template.css
    └── template.php

4 directories, 10 filesEach folder represents a block, and keeps all of its logic, styling, and markup in one place, making your theme easier to scale and maintain.
Setup the block.json data
Now, we will work on setting up the block.json files. Let’s take a look at the FAQ block:
{
  "name": "custom-namespace/block-faq",
  "title": "FAQ Block",
  "description": "A custom faq block that uses ACF fields.",
  "category": "formatting",
  "style": ["file:./template.css"],
  "script": "file:./template.js",
  "acf": {
    "mode": "edit",
    "renderTemplate": "./template.php"
  },
  "icon": {
    "src": "list-view"
  }
}Feel free to replace
custom-namespacewith something unique to your project. This helps prevent conflicts with other blocks or plugins.
Here’s what a few of the keys mean:
name– The internal block name (should be unique, ideally namespaced)title– The display name shown in the block inserterstyle/script– Points to your block-specific CSS and JS files.acf.renderTemplate– Tells ACF which PHP file to use for renderingicon– The block icon (you can use Dashicon name or custom SVG)
That’s all you really need to get started. Feel free to copy the next json files for the other blocks. Note – we won’t be using a template.js file for these so i have removed that key.
{
  "name": "custom-namespace/block-review",
  "title": "Review Block",
  "description": "A custom review block that uses ACF fields.",
  "category": "formatting",
  "style": ["file:./template.css"],
  "acf": {
    "mode": "edit",
    "renderTemplate": "./template.php"
  },
  "icon": {
    "src": "format-quote"
  }
}
{
"name": "custom-namespace/block-image",
"title": "Image Block",
"description": "A custom image block that uses ACF fields.",
"category": "formatting",
"style": ["file:./template.css"],
"acf": {
"mode": "edit",
"renderTemplate": "./template.php"
},
"icon": {
"src": "embed-photo"
}
}Register the blocks in functions.php
Now that our block folders and block.json files are set up, we need to tell WordPress about them. This is done in functions.php by looping through each block folder and registering it using register_block_type()
Here is the code for that:
<?php

function theme_register_acf_blocks () {
    if (!function_exists('register_block_type')) {
        return;
    }

    $block_json_files = glob(get_template_directory() . '/blocks/**/block.json');

    foreach ($block_json_files as $block_json_file) {
        $block_directory = dirname($block_json_file);
        register_block_type($block_directory);
    }
}
add_action('init', 'theme_register_acf_blocks');What’s happening here?
register_block_type()is a core WordPress function that registers a block using theblock.jsonfile.- We’re using
globto search theblocks/folder (and all its subfolders) for any file namedblock.json - For each
block.jsonfound, we grab its directory path and pass it toregister_block_type().
It’s that easy. This approach means any new block you add inside blocks/ will be automatically registered — no need to write a new register_block_type() call every time.
It keeps your setup clean and scalable, especially if you plan to build lots of reusable blocks in your theme.
Setting up ACF fields for our blocks
Each block will need a matching ACF field group so editors can input content in the WordPress block editor.
(Optional but recommended): Sync ACF field groups to your theme with JSON
If you want your ACF field groups to be version-controlled, portable, and easier to sync across environments (local, staging, production), ACF JSON is a great feature to enable.
First create an acf-json/ folder in your theme, then add the following to your functions.php:
// Save ACF fields to theme folder
add_filter('acf/settings/save_json', function () {
    return get_template_directory() . '/acf-json';
});

// Load ACF fields from theme folder
add_filter('acf/settings/load_json', function ($paths) {
    $paths[] = get_template_directory() . '/acf-json';
    return $paths;
});Why this is helpful:
- Field groups are saved as .json files in your theme (
acf-json/) instead of just being stored in the database. - You can commit these to Git — making field group changes easy to track and share with your team.
- When you pull down the project on another machine, ACF will auto-detect and load the field groups.
- You avoid the hassle of re-importing or manually recreating field groups in each environment.
Note: ACF only saves field groups to JSON when you edit and resave them after this filter is added. If you already made your field groups, just re-save them to trigger JSON creation.
Create field groups in the admin
We’ll keep it simple! First we’ll setup the review block fields:
- Review Text – Textarea field
- Author Name – Text field
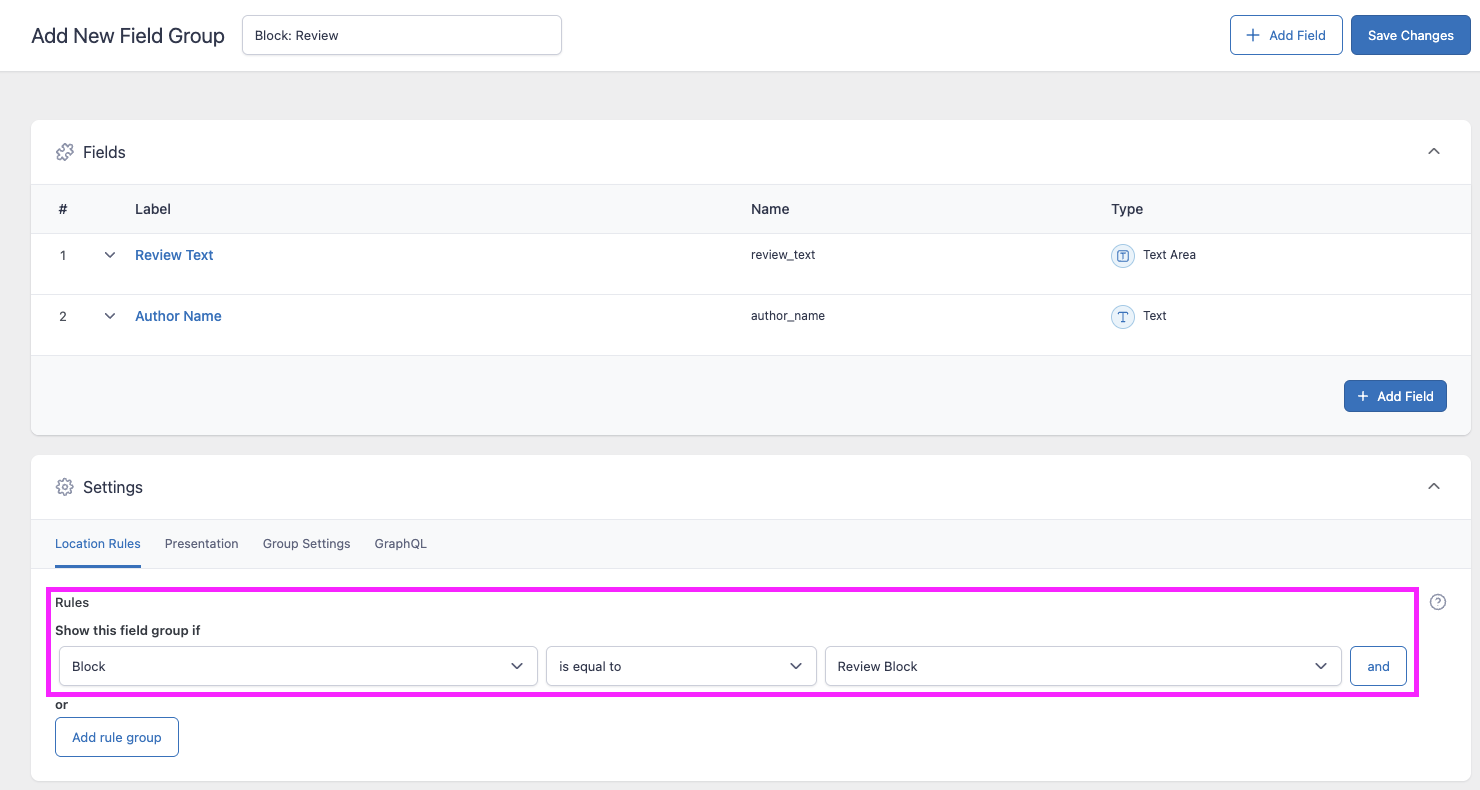
IMPORTANT! Here we need to set up the ACF rules to show up when the block is equal to the Review Block. You will do this for every single field group you create for your blocks.
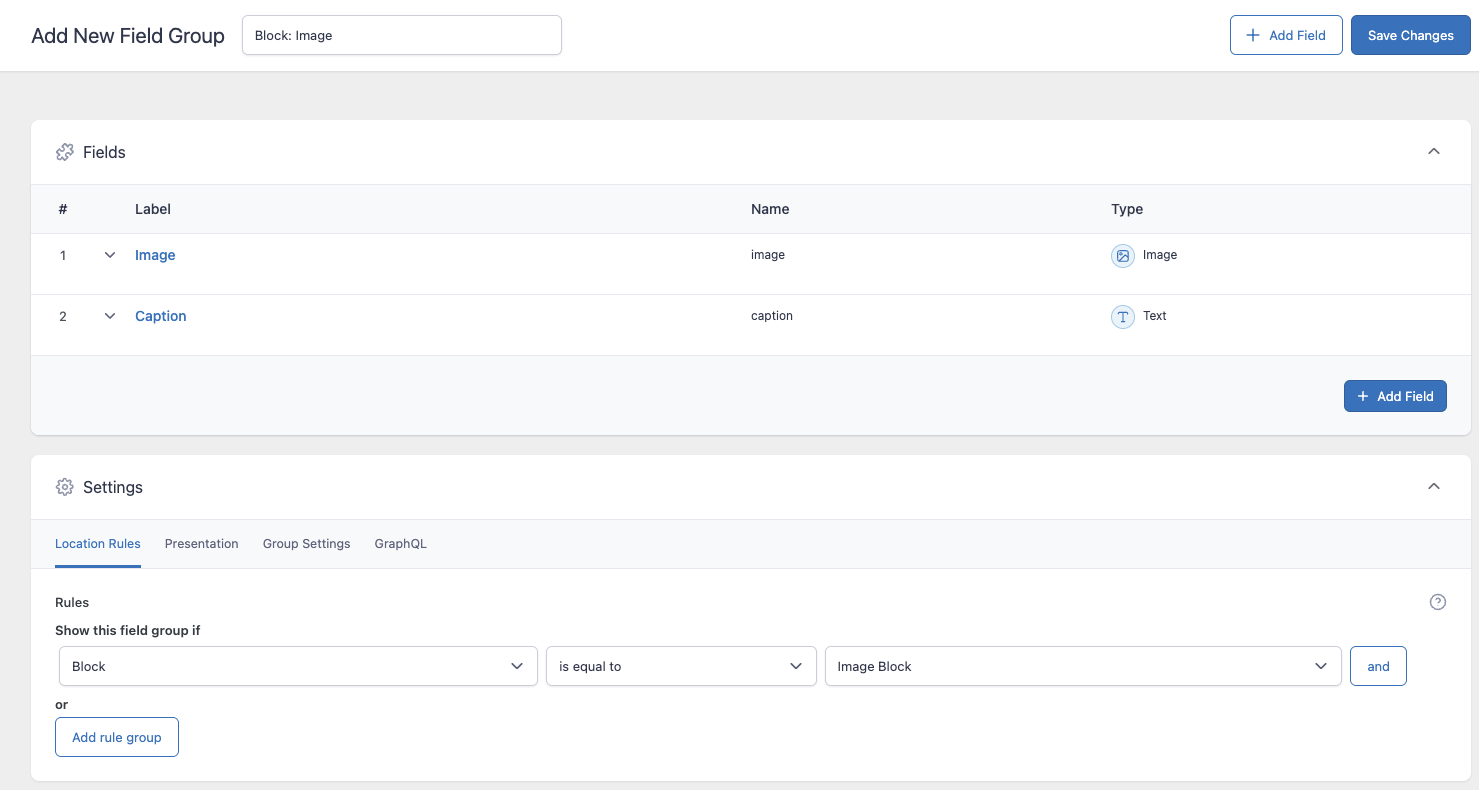
Fields for image block:
- Image – Image field
- Caption – Text field
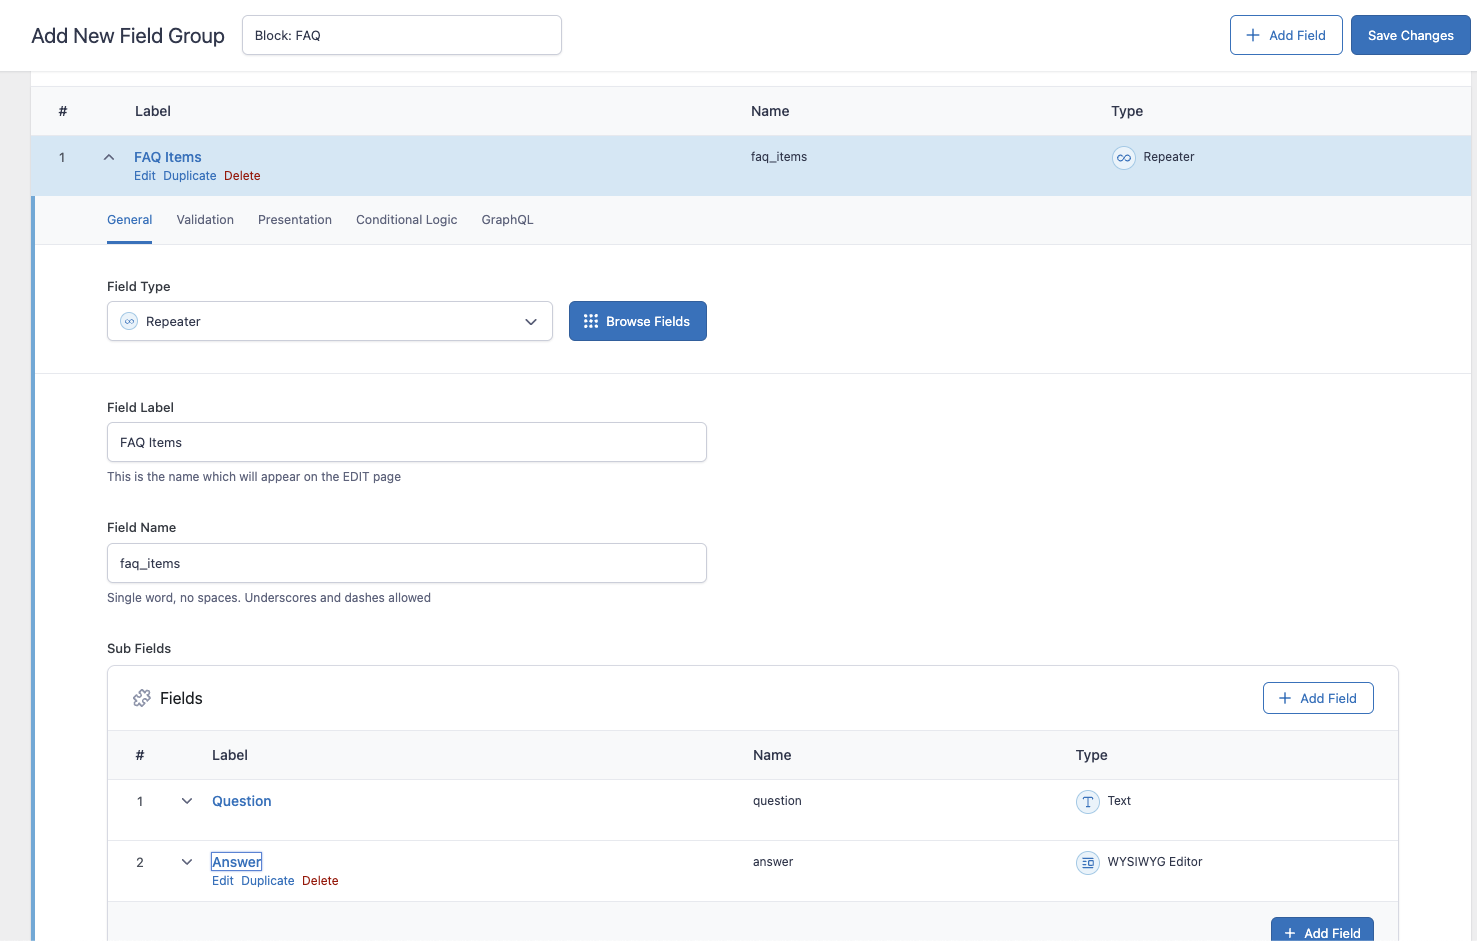
Fields for FAQ block:
- FAQ Items – Repeater field
- Question – Text sub-field
- Answer – WYSIWYG sub-field
If you enabled the acf json option, you should see these fields in your directory after saving.
acf-json
├── group_688589c5521d4.json
├── group_68858a73065eb.json
└── group_68858ad1b66f9.json

1 directory, 3 filesCreate php markup for our blocks
This is pretty much the home stretch. In this section you will just be setting up the markup for each block. Make sure you are calling the correct acf fields here. If you’ve been following exactly, I will provide the code snippets here for the markup.
Image Block
<?php
  $block_image = get_field('image');
  $block_caption = get_field('caption');

  if(!$block_image) return;
?>

<figure class="block-image">
  <img src="<?= $block_image['url']; ?>" alt="<?= $block_image['alt']; ?>">
  <?php if(!empty($block_caption)): ?>
    <figcaption><?= $block_caption; ?></figcaption>
  <?php endif; ?>
</figure>Review Block
<?php
  $review_text = get_field('review_text');
  $author_name = get_field('author_name');

  if (empty($review_text)) return;
?>

<blockquote class="block-review-text">
  <p><?= $review_text; ?></p>
  <?php if(!empty($author_name)): ?>
    <cite><?= $author_name; ?></cite>
  <?php endif; ?>
</blockquote>FAQ Block
template.php
<?php
  $block_faqs = get_field('faq_items');

  if(!$block_faqs) return;
?>

<section class="block-faq">
  <?php foreach($block_faqs as $index => $faq): ?>
    <?php $slug = sanitize_title($faq['question']); ?>
    <article class="block-faq-item">
      <h2
        class="block-faq-question <?= $index === 0 ? 'open' : ''; ?>"
        data-href="#<?= $slug; ?>">
        <?= $faq['question']; ?>
      </h2>
      <div
        class="block-faq-answer <?= $index === 0 ? 'open' : ''; ?>"
        id="#<?= $slug; ?>">
        <?= $faq['answer']; ?>
      </div>
    </article>
  <?php endforeach; ?>
</section>template.js
document.addEventListener('DOMContentLoaded', () => {
  const questions = document.querySelectorAll('.block-faq-question');

  questions.forEach((question) => {
    const targetId = question.dataset.href;
    const answer = document.getElementById(targetId);
    if (!answer) return;

    question.addEventListener('click', () => {
      const isOpen = question.classList.contains('open');

      questions.forEach((q) => {
        const otherId = q.dataset.href;
        const otherAnswer = document.getElementById(otherId);
        q.classList.remove('open');
        otherAnswer?.classList.remove('open');
      });

      if (!isOpen) {
        question.classList.add('open');
        answer.classList.add('open');
      }
    });
  });
});This is pretty much it! In the editor, you can use the slash command (e.g. /FAQ Block) to quickly insert your custom block — just like any core block.
In the GIF below, you can see once you have your block in your editor, you can update the ACF fields assigned to it. You can even preview your block in the editor.

You can find the full code on GitHub. Happy coding ✌🏻